Google app password for Kibana email connector

Trying to test your email alerting connector with a Gmail account and came across this message?
To help keep your account secure, from May 30, 2022, Google no longer supports the use of third-party apps or devices which ask you to sign in to your Google Account using only your username and password.The official Google support page shows three different fixes for this problem and obviously we have to go along with the option 3 in our case. Following are the three fixes suggested by Google,
- Update your app or operating system.
- Use more secure apps.
- Use an App Password ✅
Generate the app password
As a security measure, I have a separate Google account for testing purposes such as this one. I recommend that you do the same because loosing the main Google account will lead to a chaos. Even for a testing account, having two step verification is good.
Following are the steps to create a app password for Kibana,
- Go to myaccount.google.com and select your preferred account.
- Navigate to security tab and click on App passwords section under Signing in to Google section.

- Enter the password for your Google account when prompted.
- Select the Mail as application and the device as other.

- Enter a name which you can use identify the generated password such as “Email connector on Kibana” and click Generate button.

- Copy the generated password to use for Kibana email connector.
Configure Kibana email connector
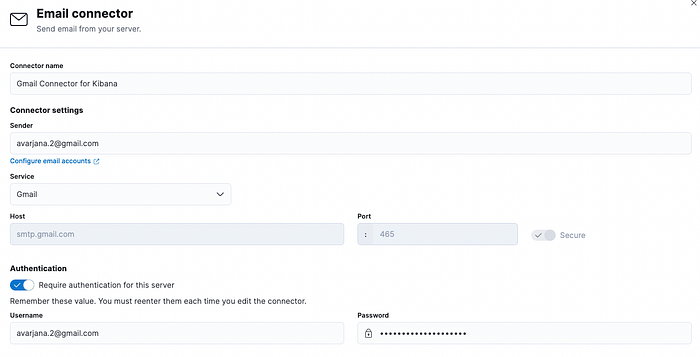
Navigate to Stack Management section from the side menu and click on Rules and Connectors. Switch to the connectors tab and create a new connector for the type Email. Filling the required fields as follows will do the trick.
- Connector name: Some name :D
- Sender: youremail@gmail.com
- Service: Gmail
- Username: youremail@gmail.com
- Password: Generated app password
Click on Save and Test to verify if your configuration is working. Add the required fields as follows in the testing section.
- To: An email address to receive the test email.
- Subject: Identifiable subject to validate the test.
- Message: Anything you want.
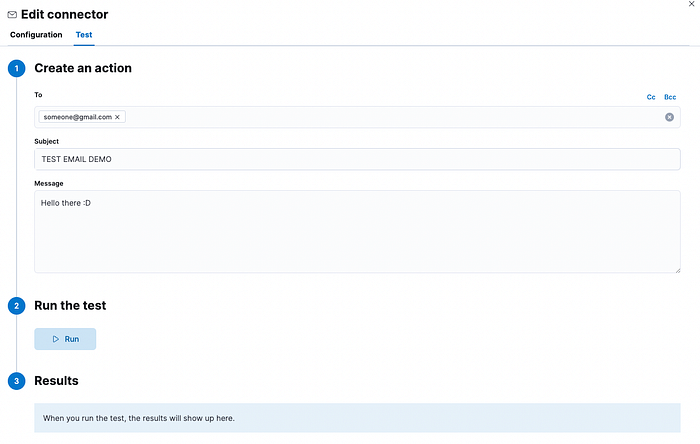
Click on the Run button and if you receive an email to the given address, congratulations are in order :D