Create a cool navigation bar for Kibana dashboard

Having a simple navigation bar inside the dashboard when you have multiple dashboards or when you’re going to provide a solution for a rookie Kibana user will help a lot. I have tried the traditional way of creating a navigation bar using simple markdown text.

There are multiple drawbacks in this approach with styling and alignments. In simple words, “IT’S UGLY”. I was exploring other options and came across TSVB. There is an option to create a markdown with the ability to customise the CSS to style the text. Let’s see how we can use this to create a much cooler navigation bar in this article.

Creating the basic visualisation
Navigate to Analytics > Visualize Library in Kibana and press on Create visualization. Select TSVB from the visualisation types popup.

Switch to Markdown type from the tabbed navigation on top. You need to select a Data view to proceed from the Panel options tab at the navigation on bottom next to Data tab.

Add the navigation links you need as follows. Change the title as your preference. Selected navigation item will be in bold. This is a static visualisation. You need to create a widget per dashboard and edit the selected item and the title.

Styling the navigation bar
Navigate to Panel options and scroll down to Style section. Following is a sample style you can do for the navigation bar.
A:LINK{
  background-color:blue;
  padding:8px;
  border-radius:4px;
  font-size:120%;
  margin:4px;text-decoration:none
}A:HOVER{
  background-color:darkblue;
  text-decoration:none!important
}H1{
  text-align:center;
  color:red
}P{
  text-align:center;
  color:white;
}
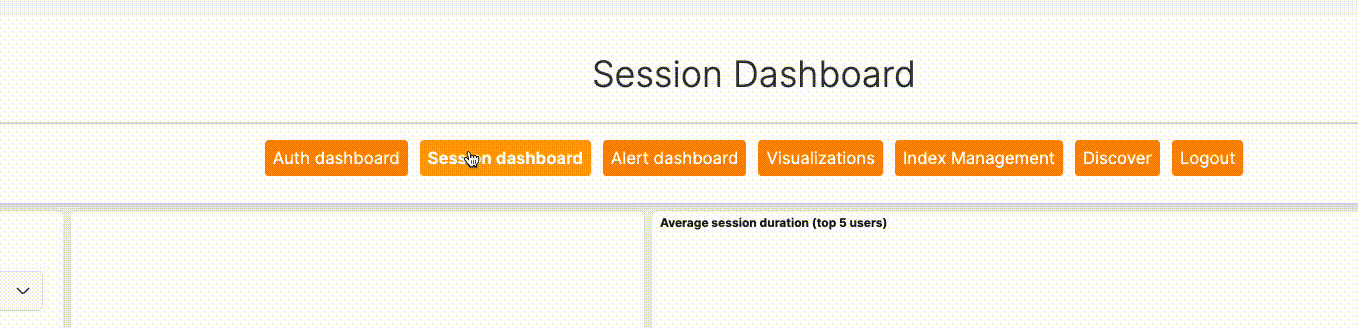
Each hyperlink in markdown gets converted into an anchor tag which is in the p tag. The topic is a h1 tag. You can get a better understanding when you go to inspect element mode in the browser. Try to capture the styles applied and there you may find some default overrides such as the text-decoration on hover. Be mindful to add them in your custom CSS as !important. After applying the above styles you navigation should look like this.

Save this visualisation and add it to your dashboards and place it in the same position with the same size across dashboards to have a smooth transition. Don’t forget to play with the styles and create awesome stuff ❤
Here’s a demo on the one that I have added in the cover
Hope you enjoyed the content. Stay tuned for more hacks :D